Hull Detailing – before Hull Assembly
As with other boat I have built — like U-673 and U-505 which was started with these same steps — it is indeed challenging and time-consuming to detailing of the hull... there is so much of it to work on!
- Flood channel louvers
- Balcongerät sonar apparatus
- Lower flood doors
- Lower flood holes
- Hull vents & grills (various)
- Anchor alcove
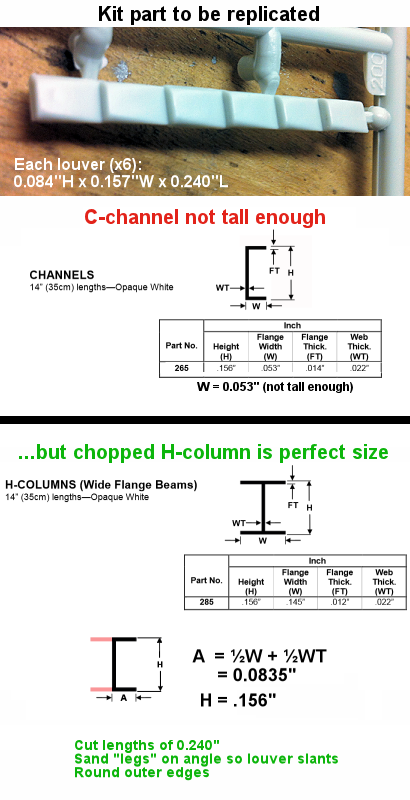
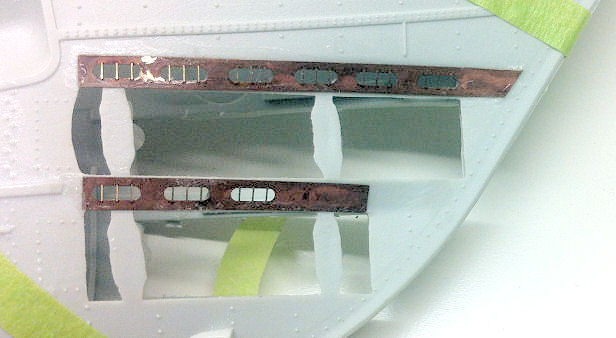
Flood Channel Louvers
The two rearmost main flood channels on each side of the hull were covered with louvers (3 louvers over each channel).
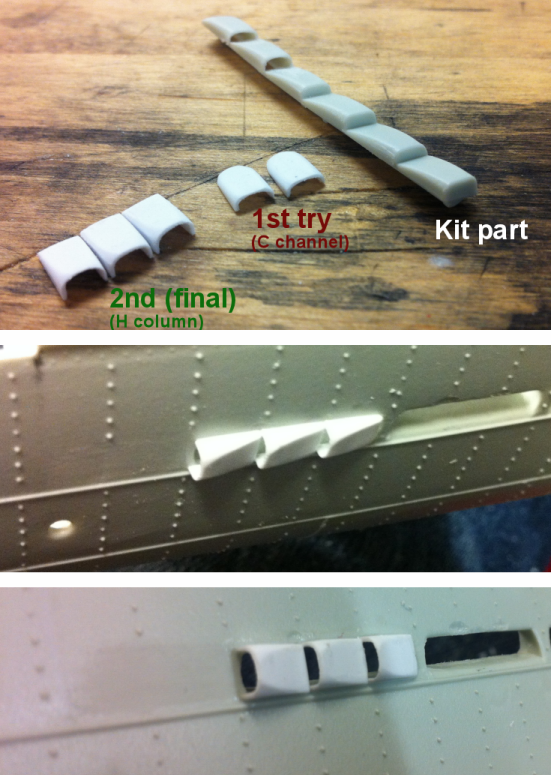
The kit supplies 2 molded parts for 6 louvers, but they are fairly crude and the ends are closed.
In trying to drill out the ends of the kit part, it broke apart.
I ended up creating each louver separately from Evergreen strip styrene, H-column #285.
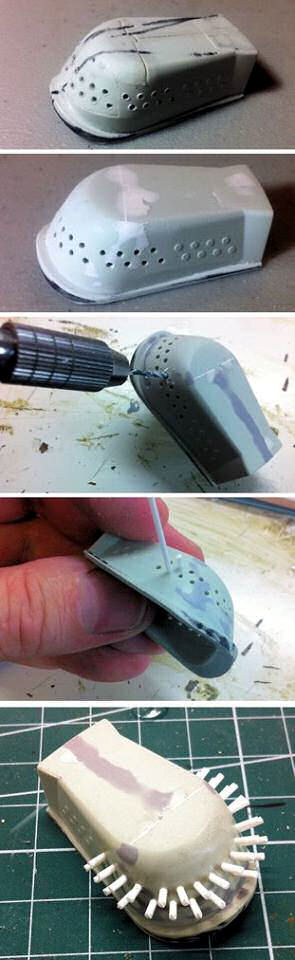
Balcongerät Sonar Apparatus
U-190 had a Balcongerät, a streamlined passive-sonar array on the leading edge of the keel.
The kit part is composed of 3 separate pieces instead of 1, with join lines located amongst numerous detector heads.
Knowing that I have no choice but to fill & smooth the awkwardly-placed seams, I knew I would need to replace most of the detectors.
I drilled out each of the detectors with a 0.042" drill bit. Then I proceeded to fill the join seams with putty, then sanded them smooth.
Next I glued short lengths of 0.045" styrene rod into the 32 holes. After these are dry, I will cut & file to the proper length.
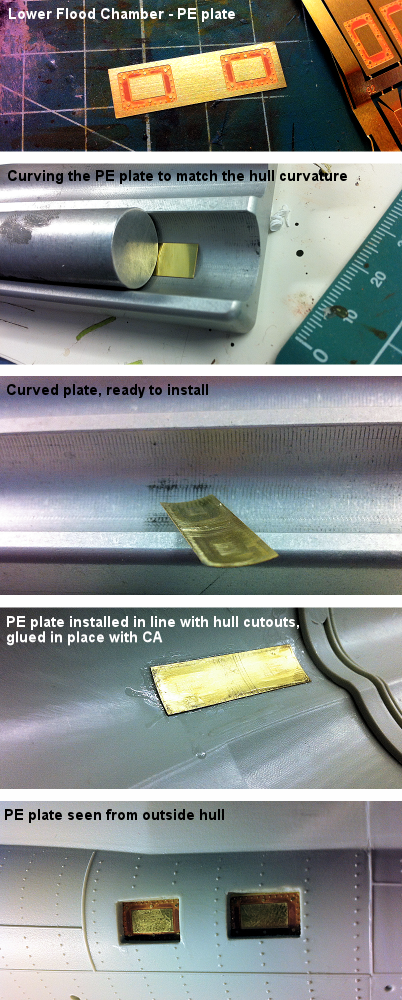
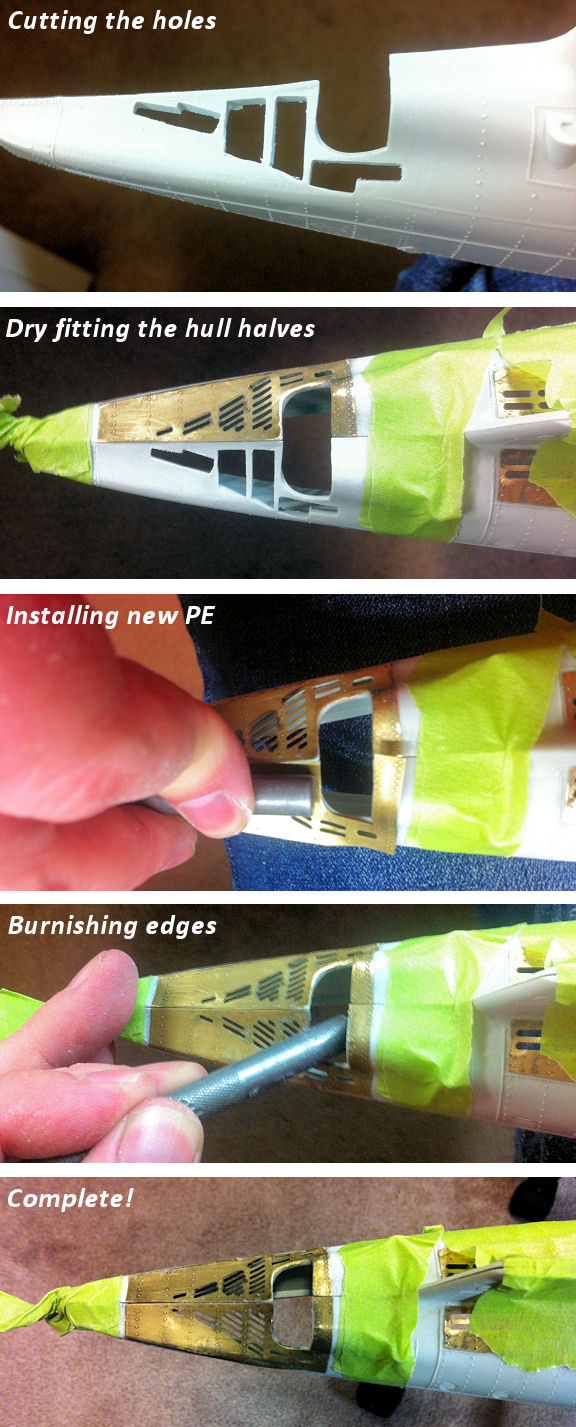
Lower Flood Doors
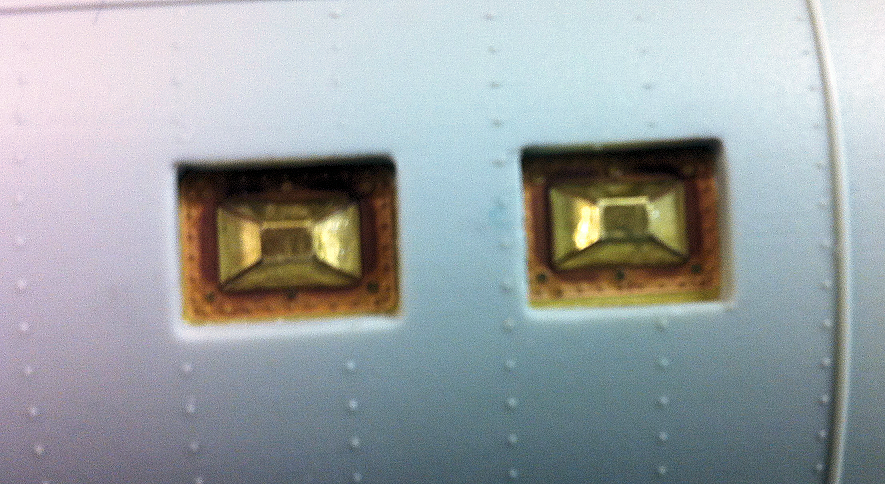
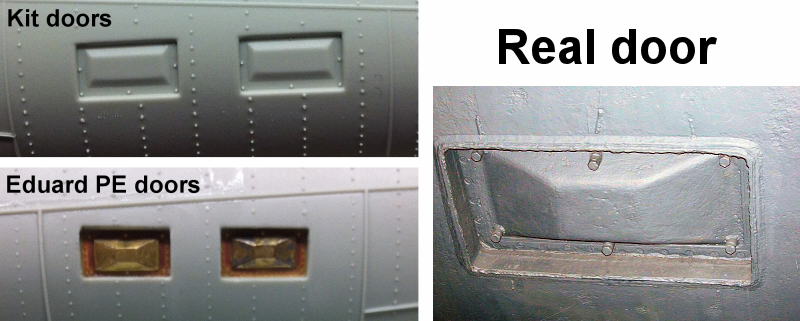
From the Eduard #53159 set, I am installing the numerous lower flood doors along the bottom of the hull – groups of rectangular holes with inlet blocks. The Eduard parts have much better detail, and the inlet blocks are separate from the baseplates.
- Cut out all of the rectangular holes in the hull (13 per side, in groups of 2 and 3) and file them to shape.
- Prepared & installed the PE baseplates. These had to be pre-curved to match the curvature of the inner hull, and then were glued inside their respective holes using CA glue.
- Prepared & installed the inlet blocks. There were 1-piece trapezoidal-shaped blocks. After folding to shape, I used solder to secure the inside seams, then filled the outer seams with CA and filed them smooth The blocks were installed in the center of each plate, CA'd in place.
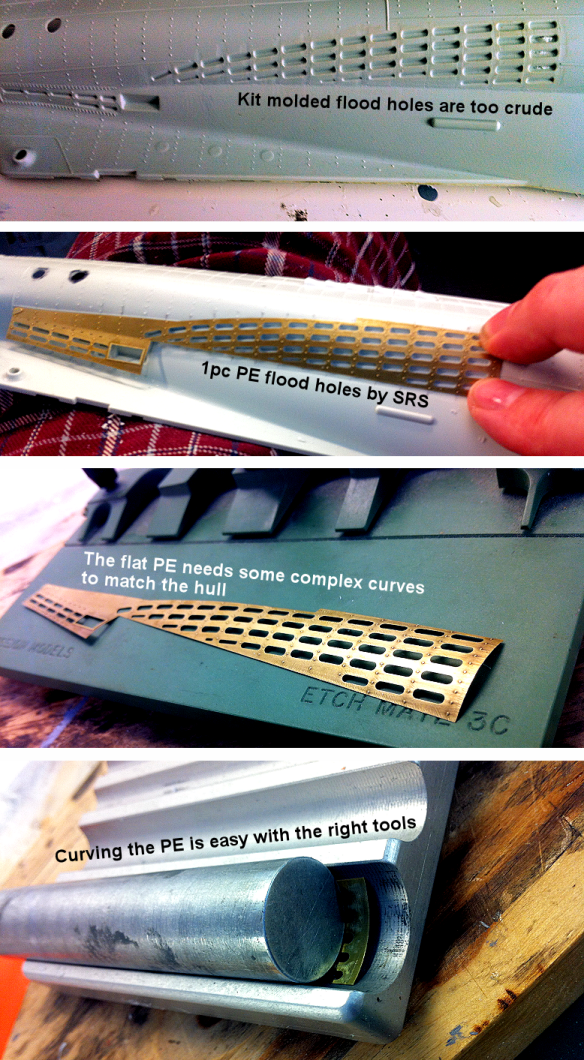
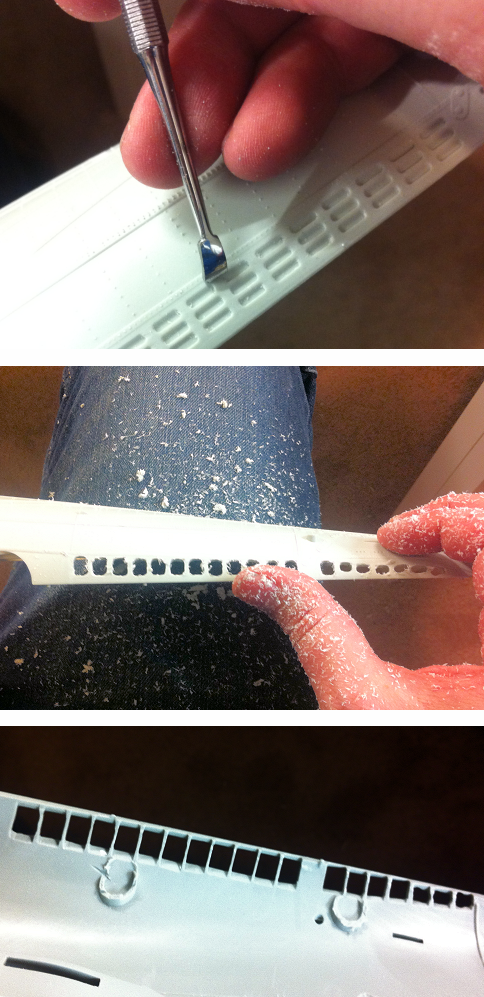
Lower Flood Holes
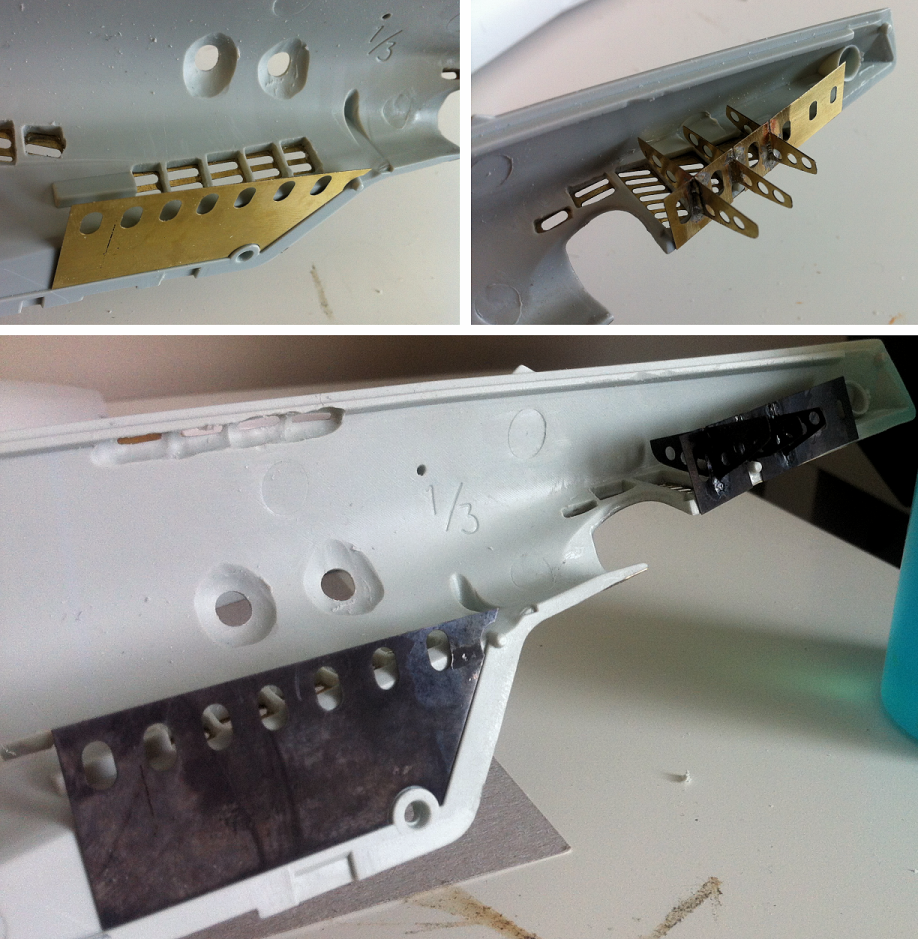
In order to replicate the proper lower flooding hole patterns at the bow and stern, I am using SRS-1450 Flood Holes & Baffle Plates set.
The external flood holes are created in large, thin sheets (with rivet detail) which fit very well on the kit hull.
There are numerous PE templates, and the following process works well to install all pieces:
- If the sheet requires bending and curving, this is easily achieved with the proper PE bending tools.
- Use a scraper to remove all surface detail where the PE template will be placed.
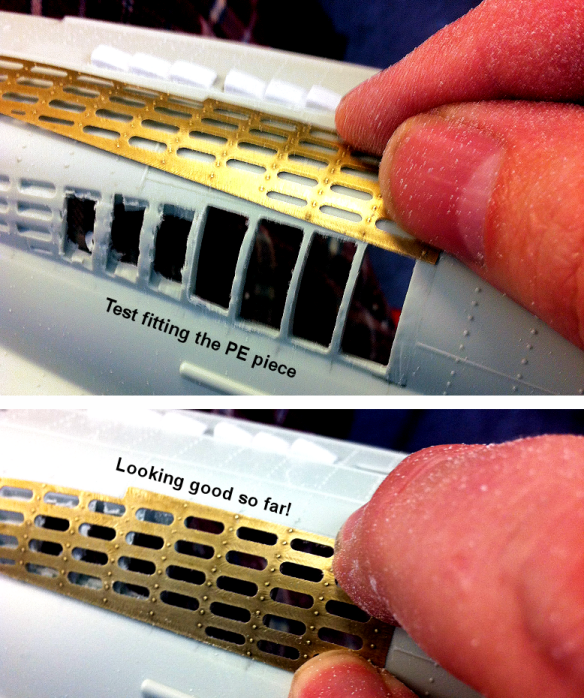
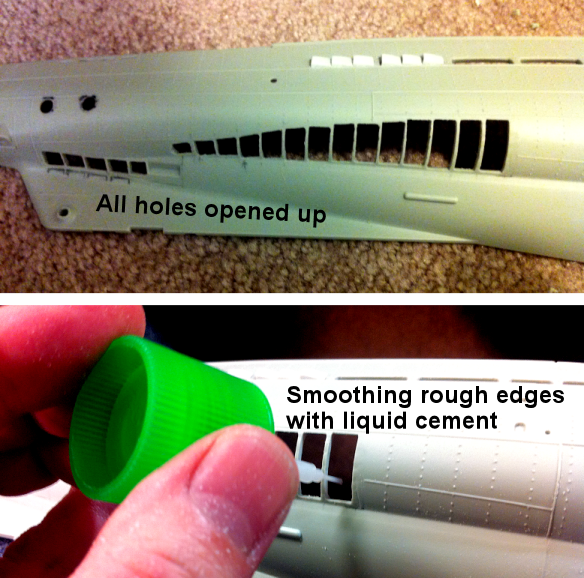
- Drill/cut out all molded flood holes, file the holes square with a file (so nothing blocks the holes in the PE). Test fit the PE template often.
- After all holes are filed to shape, smooth/seal edges with thin liquid cement to "de-fuzz" the plastic.
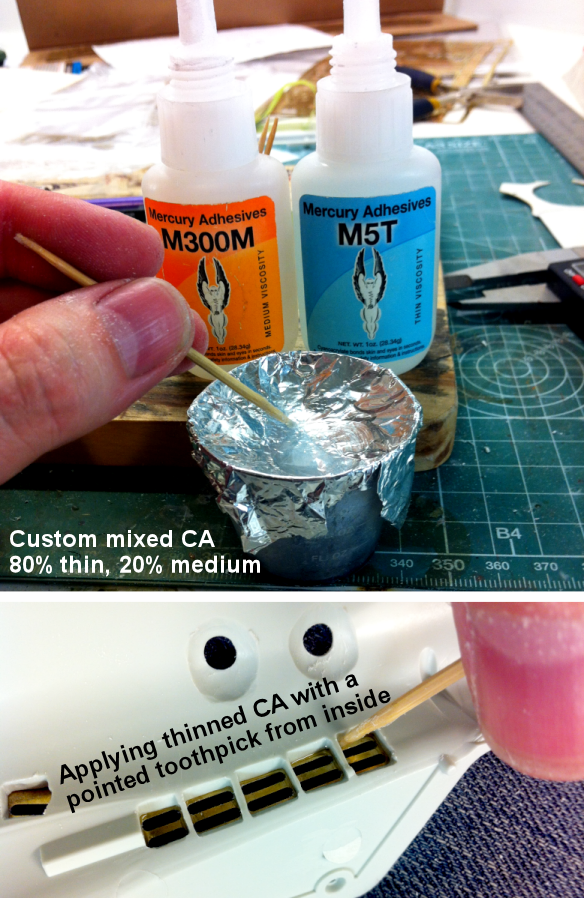
- Prepare a custom blend of CA in a foil-lined mixing cup: 80% thin + 20% medium CA. (Thin CA does not pick up well on a toothpick.)
- Position a central point of the PE template on the hull, and glue into place using CA.
- Moving to the inside, apply CA (with a toothpick) to where the PE meets the edges of each hole in the plastic.
- Moving along the outside, applied CA to outer edges. Quickly wipe away any excess CA.
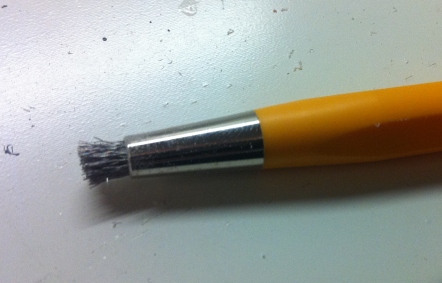
- Use a micro wire brush to clean any excess CA from the PE.
- Lightly sand & thin outer edges with a small sanding stick, this will help reduce the amount of filler needed to blend the PE into the hull.

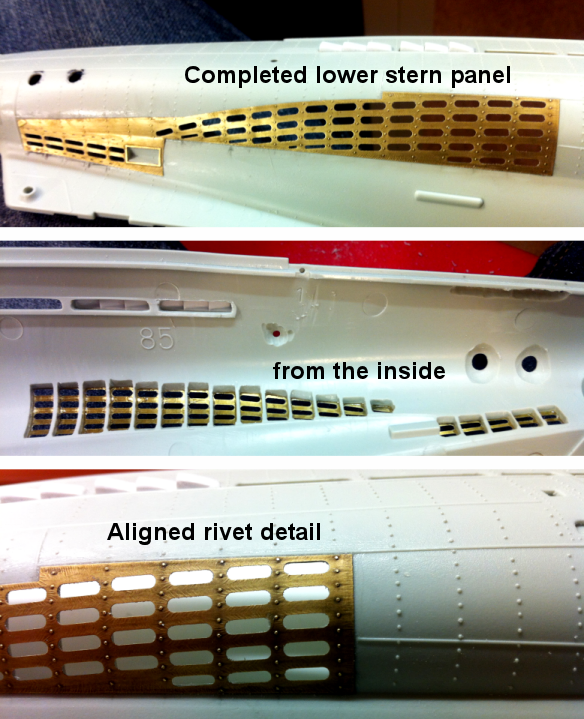
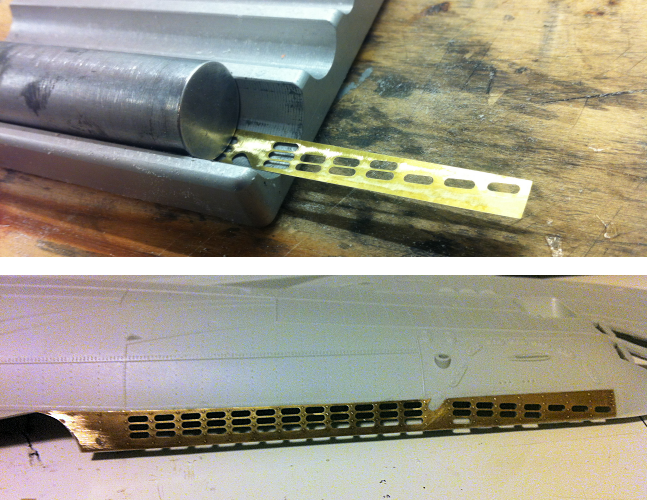
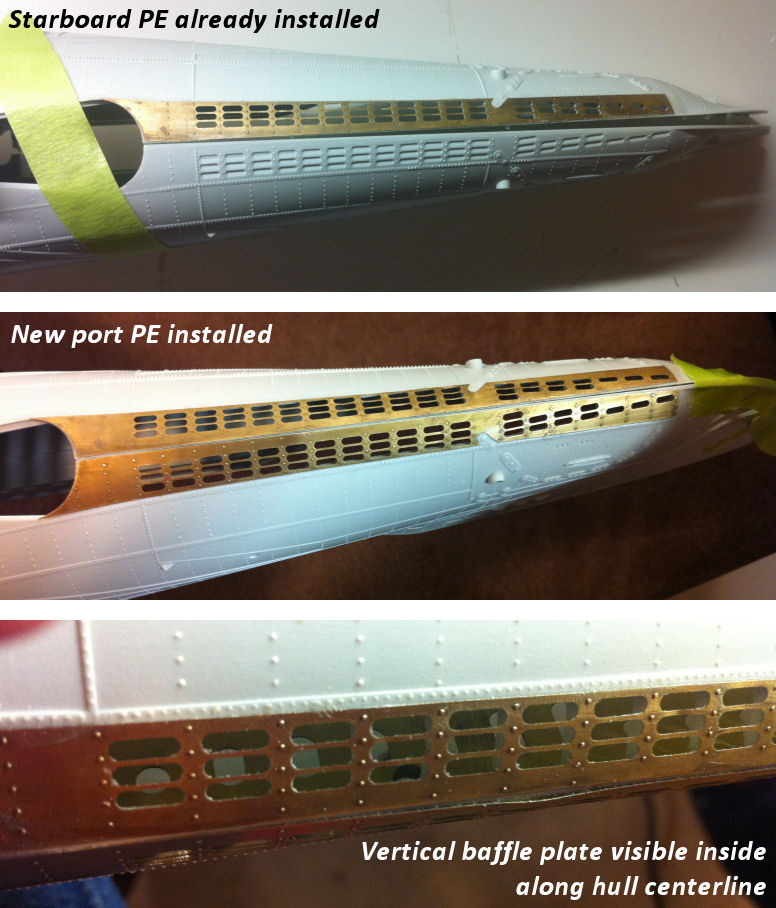
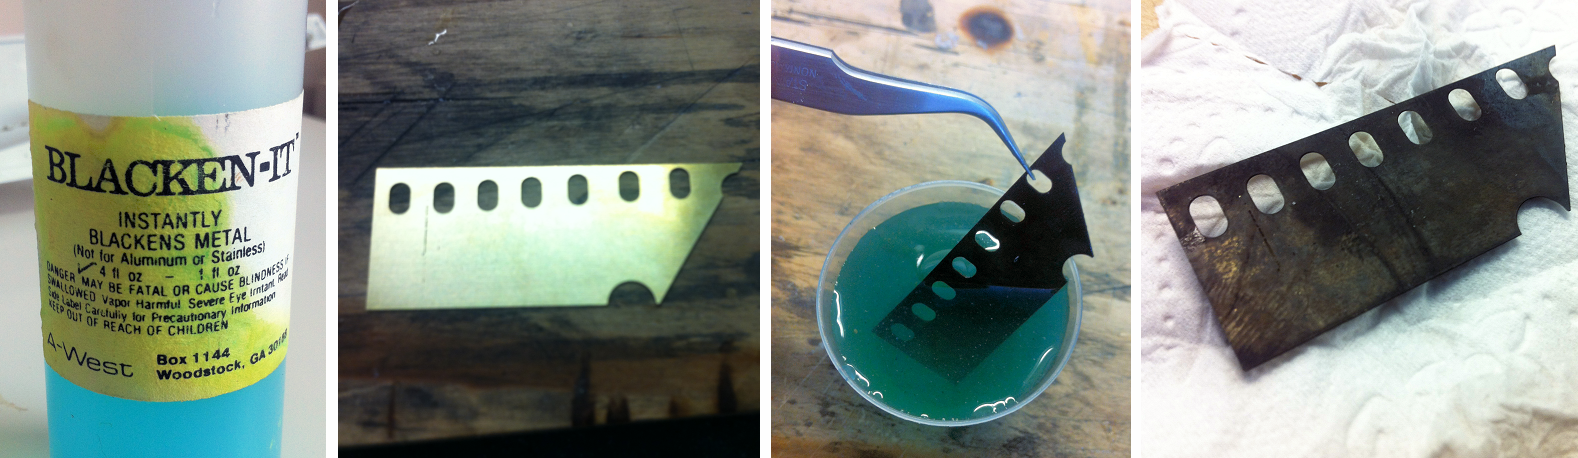
For the internal baffle plates (bow, stern), I soldered together the pieces, then used Blacken-It to darken the metal.
Since solder does not darken with "Blacken-It", I lightly brushed on some Citadel "Chaos Black" primer (which adheres well to PE, plastic, etc.)
In retrospect, I should have tried using Jax blackener instead (as it is supposed to blacken solder).
Hull Vents & Grills(various)
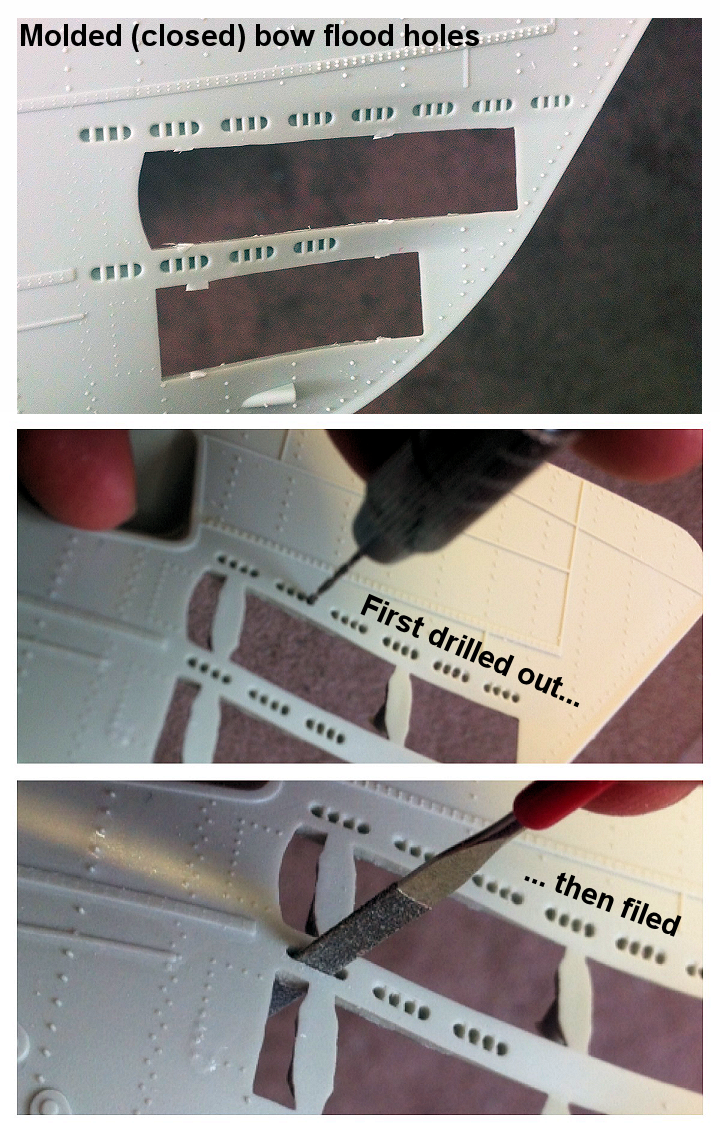
There are numerous holes, vents, and grills on the hull which are molded closed. With a little bit of effort, these can be opened up and detailed.
Around the bow torpedo doors are several sets of oblong flood holes.
These were opened up, filed to shape, and then PE details were added atop.
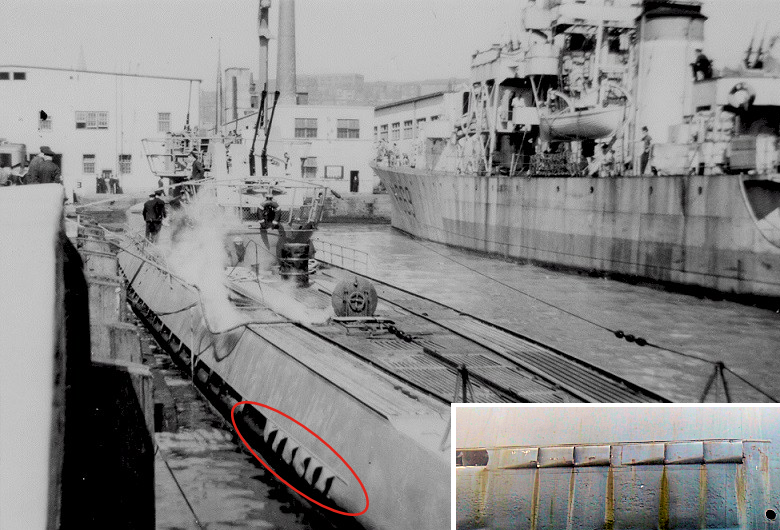
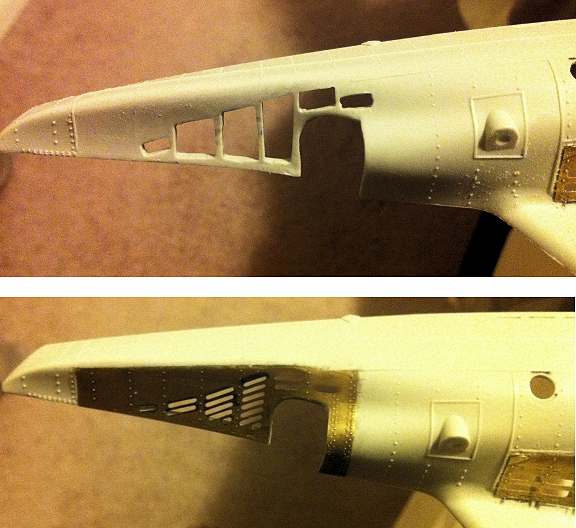
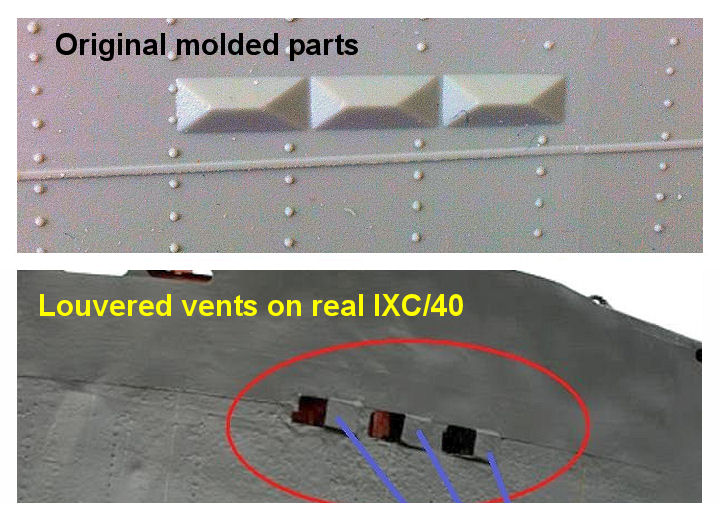
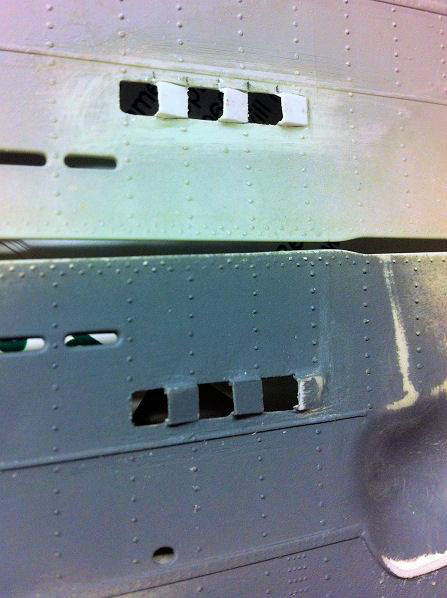
Slightly back from the bow near the top of the hull are 3 covered flood holes.
The kit represents these with 3 molded covers, but unfortunately they do not resemble the flood holes on the real boat (which were ½ covered holes).
The molded covers were completely removed - a rectangular hole was cut in the hull.
Then three C-channels (each side) were shaped and glued in place to create more accurate louvers.
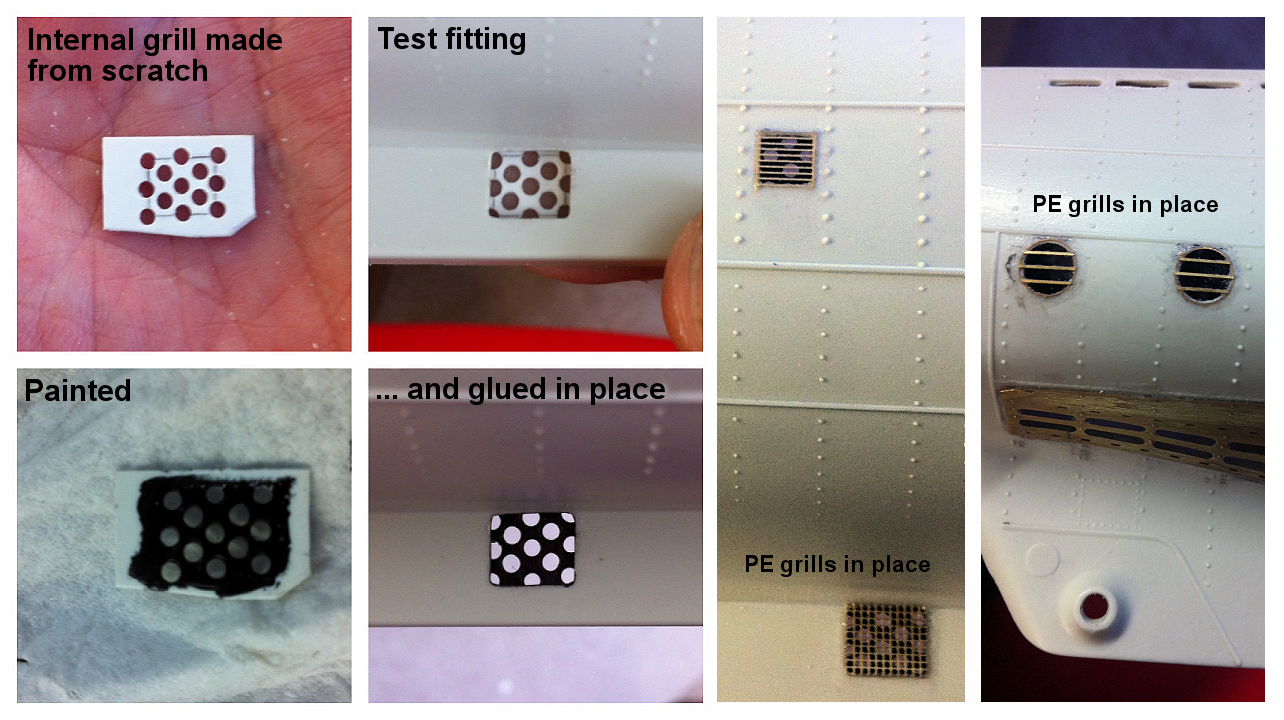
Various molded vents & grills (square, round) were opened in the hull with carefull drilling & filing.
Baffle plates (with or without holes) were added behind, and then fine PE grills were glued on the outside.
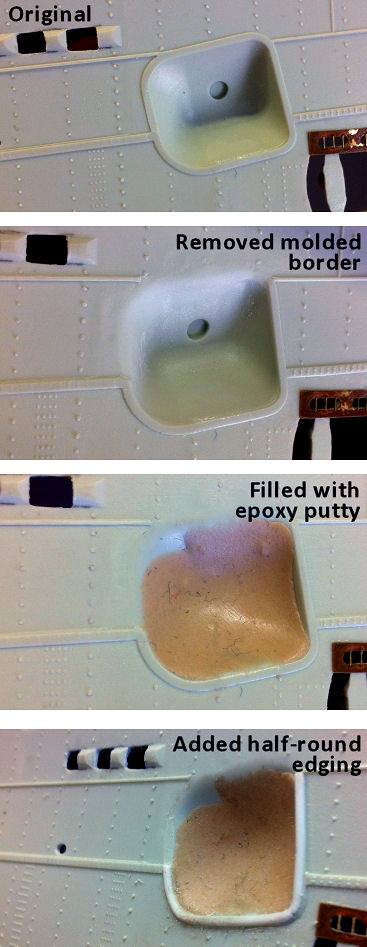
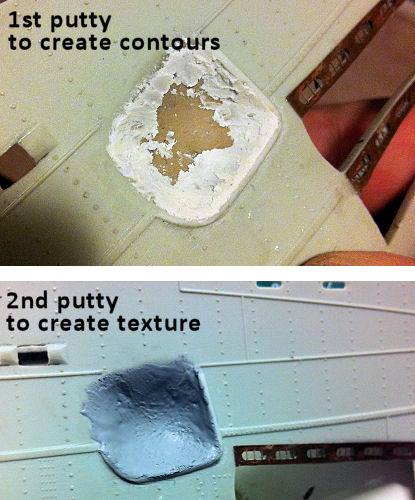
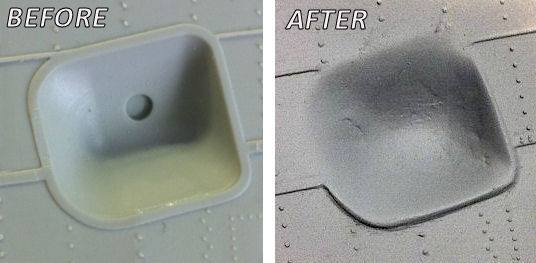
Anchor Alcove
The alcove for the bow anchor is a little bit too deep and square-edged, so I used epoxy putty to fill in the anchor alcove a bit and give it softer edges where it meets the outer hull. A thin lip was added to the lower edge of the anchor cavity using a piece of half-round 0.040" strip styrene. Tamiya Putty was then used to fill in and smooth the bottom edge of the alcove where it met tne lower lip.